> For the complete documentation index, see [llms.txt](https://docs.heeler.com/mrecEO40m5D6bt7Pq5pE/llms.txt). Markdown versions of documentation pages are available by appending `.md` to page URLs; this page is available as [Markdown](https://docs.heeler.com/mrecEO40m5D6bt7Pq5pE/get-started/cloud-and-runtime/amazon-web-services/aws-single-account-setup.md).

# AWS Single Account Setup

Connect a single AWS account to Heeler with CloudFormation, Terraform, or the AWS CLI.

To connect one AWS account, Heeler deploys a template that creates a dedicated **`heeler-member`** IAM role and scoped policies — read access to metadata and configuration only, never your data. Pick **CloudFormation** (the wizard launches it), **Terraform**, or the **AWS CLI**.

## CloudFormation

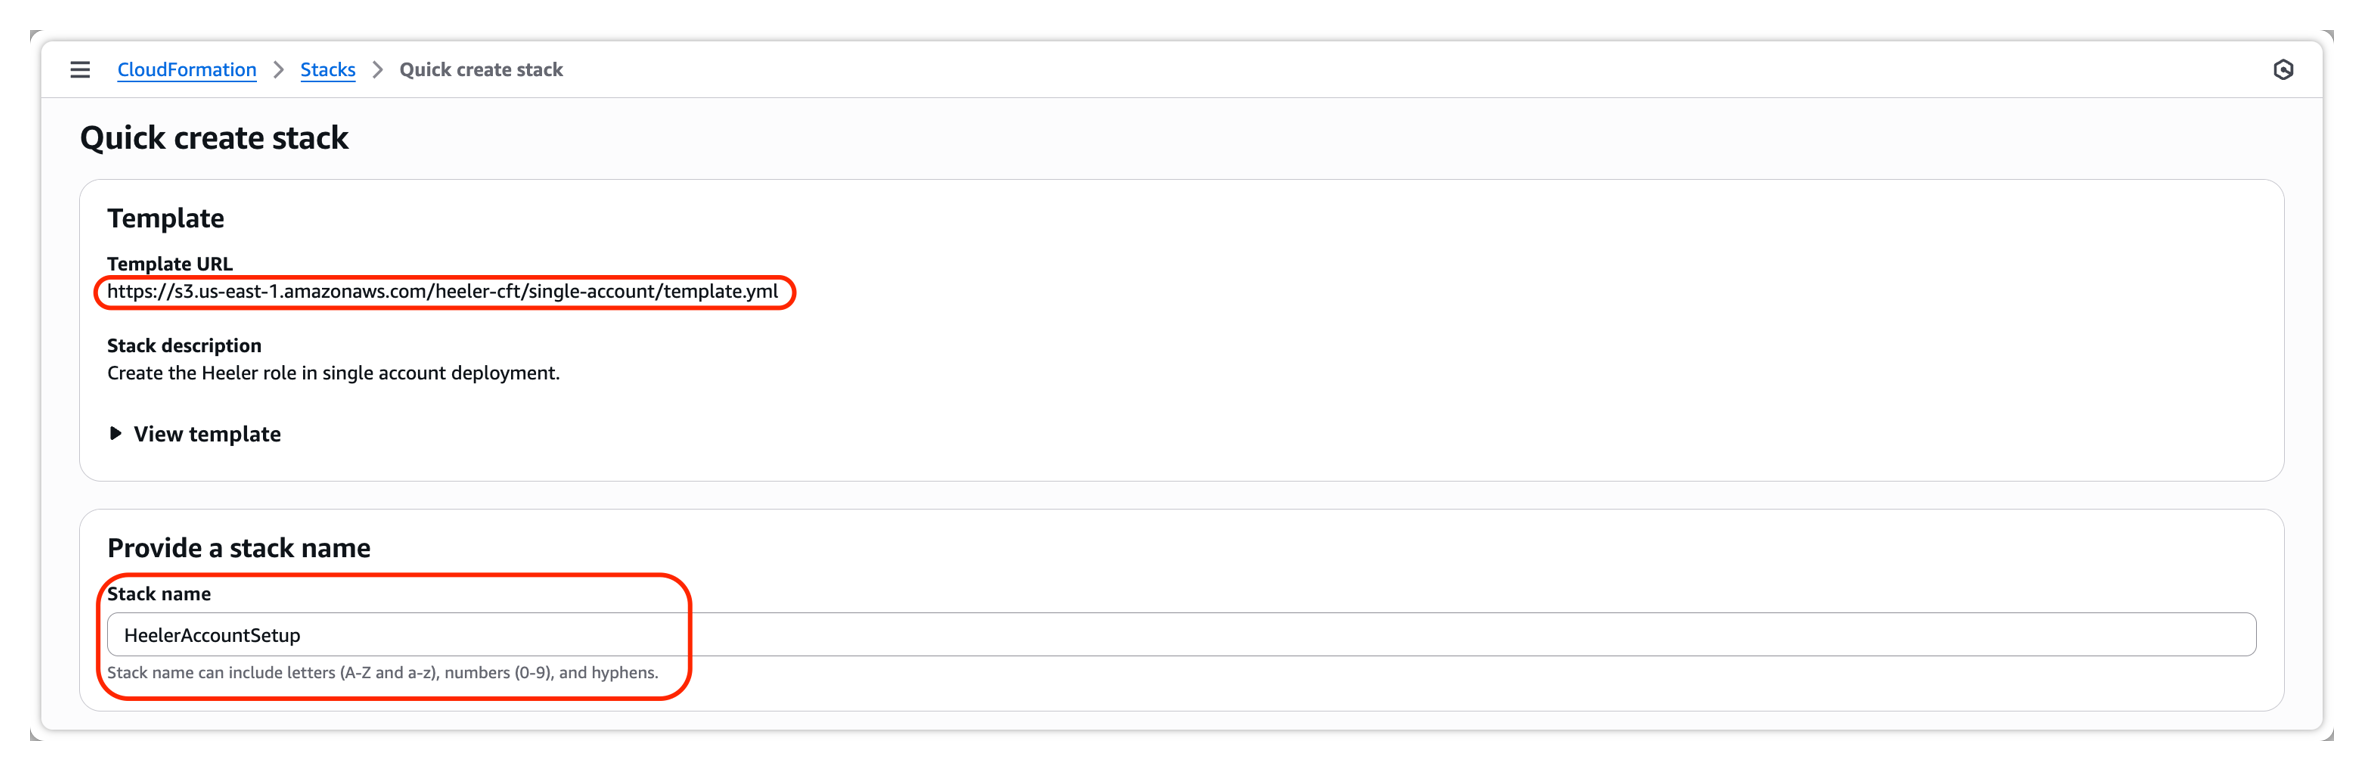
If you'd rather deploy it yourself, the single-account template is also published at `https://s3.us-east-1.amazonaws.com/heeler-cft/single-account/template.yml`.

{% stepper %}
{% step %}

### Start the wizard

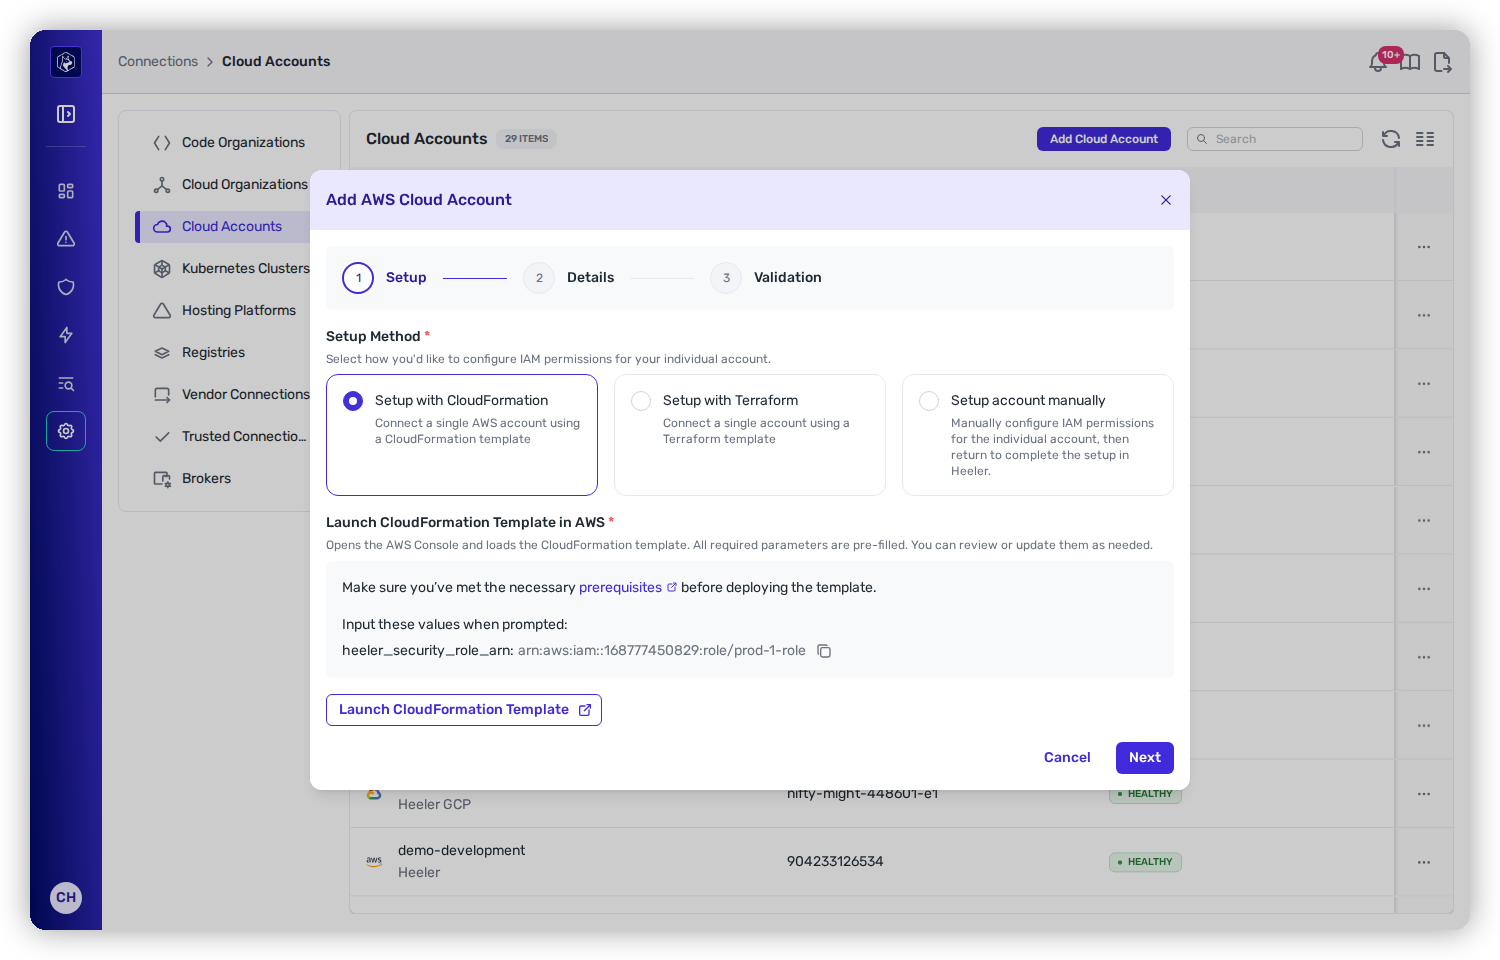
In Heeler, go to **Connections → Cloud Accounts → Add Cloud Account → AWS → Setup with CloudFormation**, then **Launch CloudFormation Template**. Sign in to a session in the target account. Click **Next** in Heeler to reveal the generated **External ID**.

<figure><img src="https://414480750-files.gitbook.io/~/files/v0/b/gitbook-x-prod.appspot.com/o/spaces%2FXP3dp2kecwKA2KvYkntz%2Fuploads%2Fgit-blob-4e9aab4a02ab09a2570ab8e7ef27136f54a2247c%2Fcc-cloud-awssingle-02.png?alt=media" alt="The Add Cloud Account wizard in Heeler with Setup with CloudFormation, Setup with Terraform, and Setup account manually options, and a Launch CloudFormation Template button."><figcaption><p>Under <strong>Connections → Cloud Accounts</strong>, start <strong>Add Cloud Account</strong> and choose <strong>Setup with CloudFormation</strong>.</p></figcaption></figure>
{% endstep %}

{% step %}

### Set the parameters and create

Confirm the stack name is `HeelerAccountSetup`, then set:

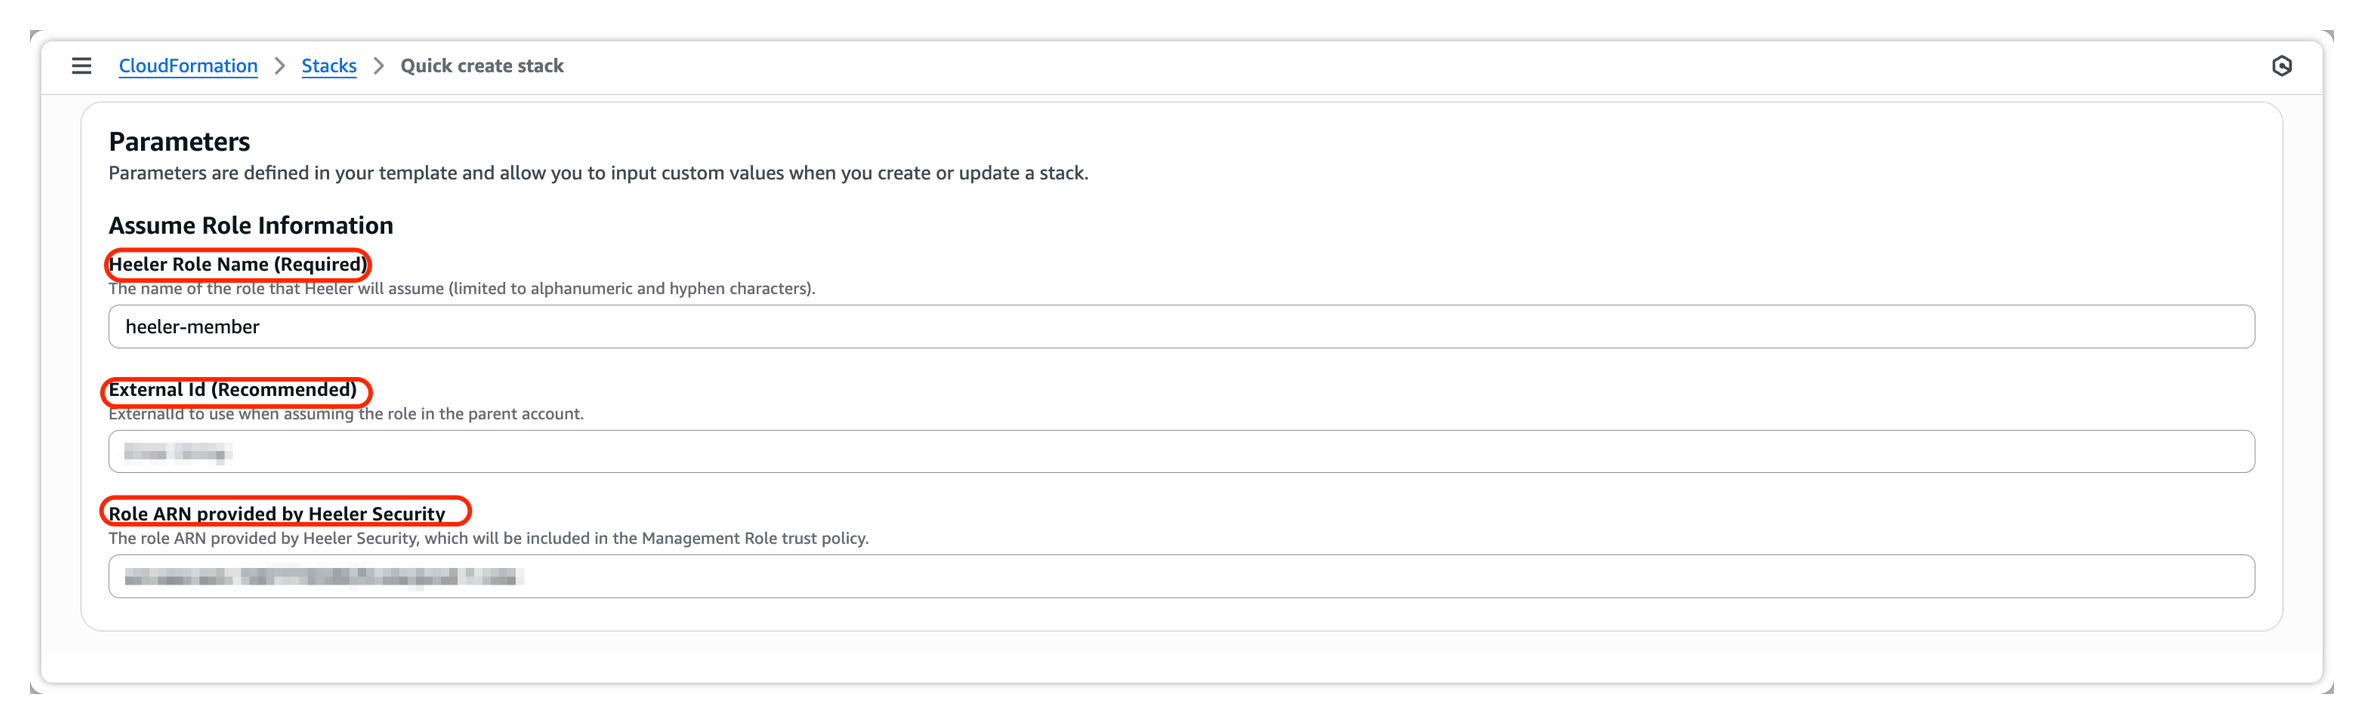
* **Heeler Role Name** — default `heeler-member`.
* **External ID** — the value generated by Heeler.
* **Role ARN provided by Heeler** — leave as default unless instructed otherwise.
* **Use a Kubernetes ClusterRole you manage** — default `false`. Set it to `true` to skip creating the EKS access policy. See [A ClusterRole you manage](/mrecEO40m5D6bt7Pq5pE/get-started/cloud-and-runtime/amazon-web-services.md#a-clusterrole-you-manage).

<figure><img src="https://414480750-files.gitbook.io/~/files/v0/b/gitbook-x-prod.appspot.com/o/spaces%2FXP3dp2kecwKA2KvYkntz%2Fuploads%2Fgit-blob-d23cda7676ee5af3a6de47b4a7a89ece8b178648%2Fcc-cloud-awssingle-07.png?alt=media" alt="The AWS CloudFormation Quick create stack page showing the single-account template URL and the HeelerAccountSetup stack name."><figcaption><p>Confirm the Heeler template URL and the default <code>HeelerAccountSetup</code> stack name.</p></figcaption></figure>

<figure><img src="https://414480750-files.gitbook.io/~/files/v0/b/gitbook-x-prod.appspot.com/o/spaces%2FXP3dp2kecwKA2KvYkntz%2Fuploads%2Fgit-blob-3d8e375e0b561a8f2925884dc197b4247c372926%2Fcc-cloud-awssingle-08.png?alt=media" alt="The CloudFormation Parameters form with Heeler Role Name (heeler-member), External Id, and Role ARN provided by Heeler Security fields."><figcaption><p>Set <strong>Heeler Role Name</strong>, paste the generated <strong>External Id</strong>, and leave the Heeler-provided role ARN as default.</p></figcaption></figure>

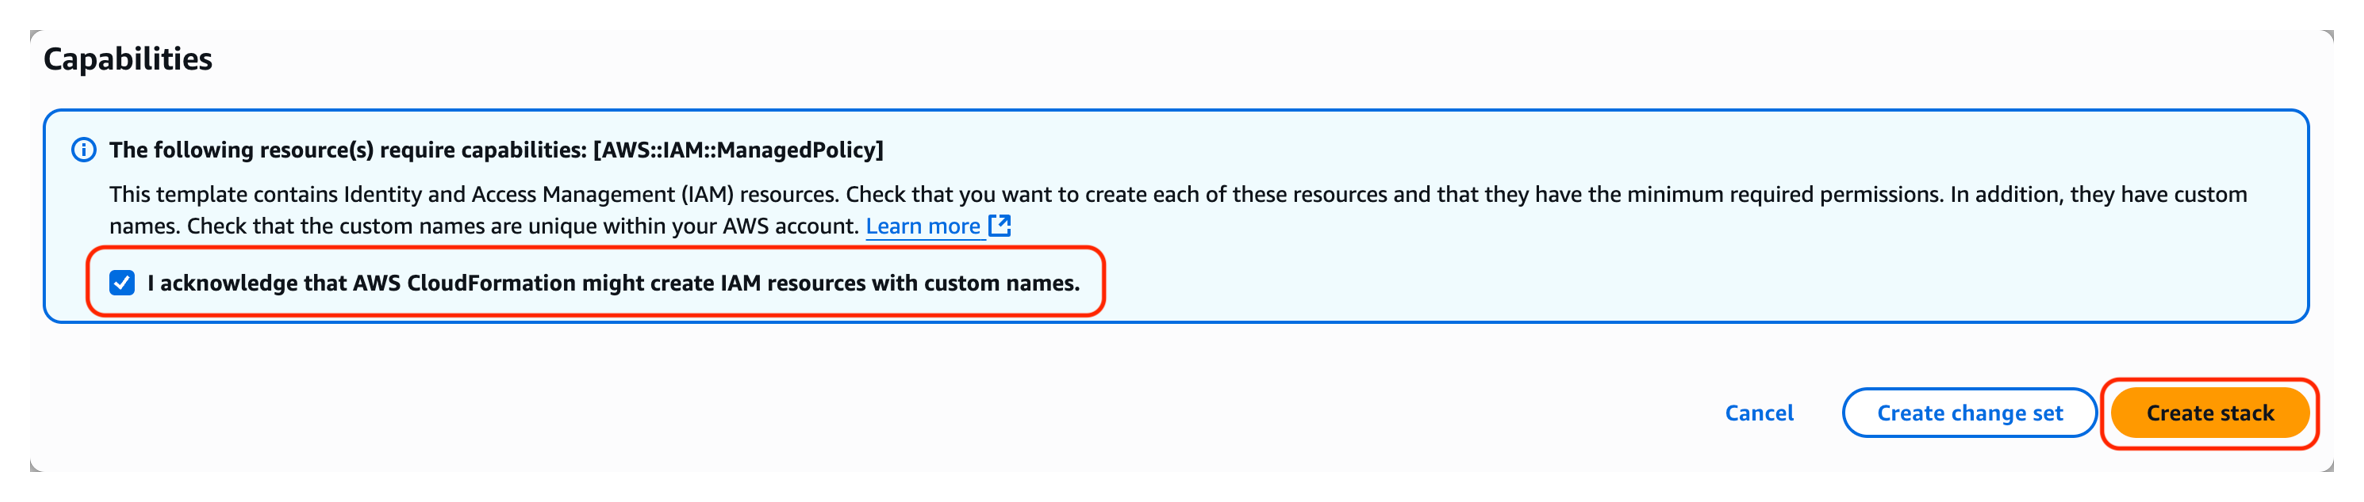
Acknowledge IAM creation and click **Create stack**.

<figure><img src="https://414480750-files.gitbook.io/~/files/v0/b/gitbook-x-prod.appspot.com/o/spaces%2FXP3dp2kecwKA2KvYkntz%2Fuploads%2Fgit-blob-dc9dc9d7859496168c079737e2bcf07f86360f28%2Fcc-cloud-awsorg-07.png?alt=media" alt="The CloudFormation Capabilities panel with the IAM resource acknowledgement checkbox selected and the Create stack button."><figcaption><p>Acknowledge that CloudFormation may create named IAM resources, then <strong>Create stack</strong>.</p></figcaption></figure>

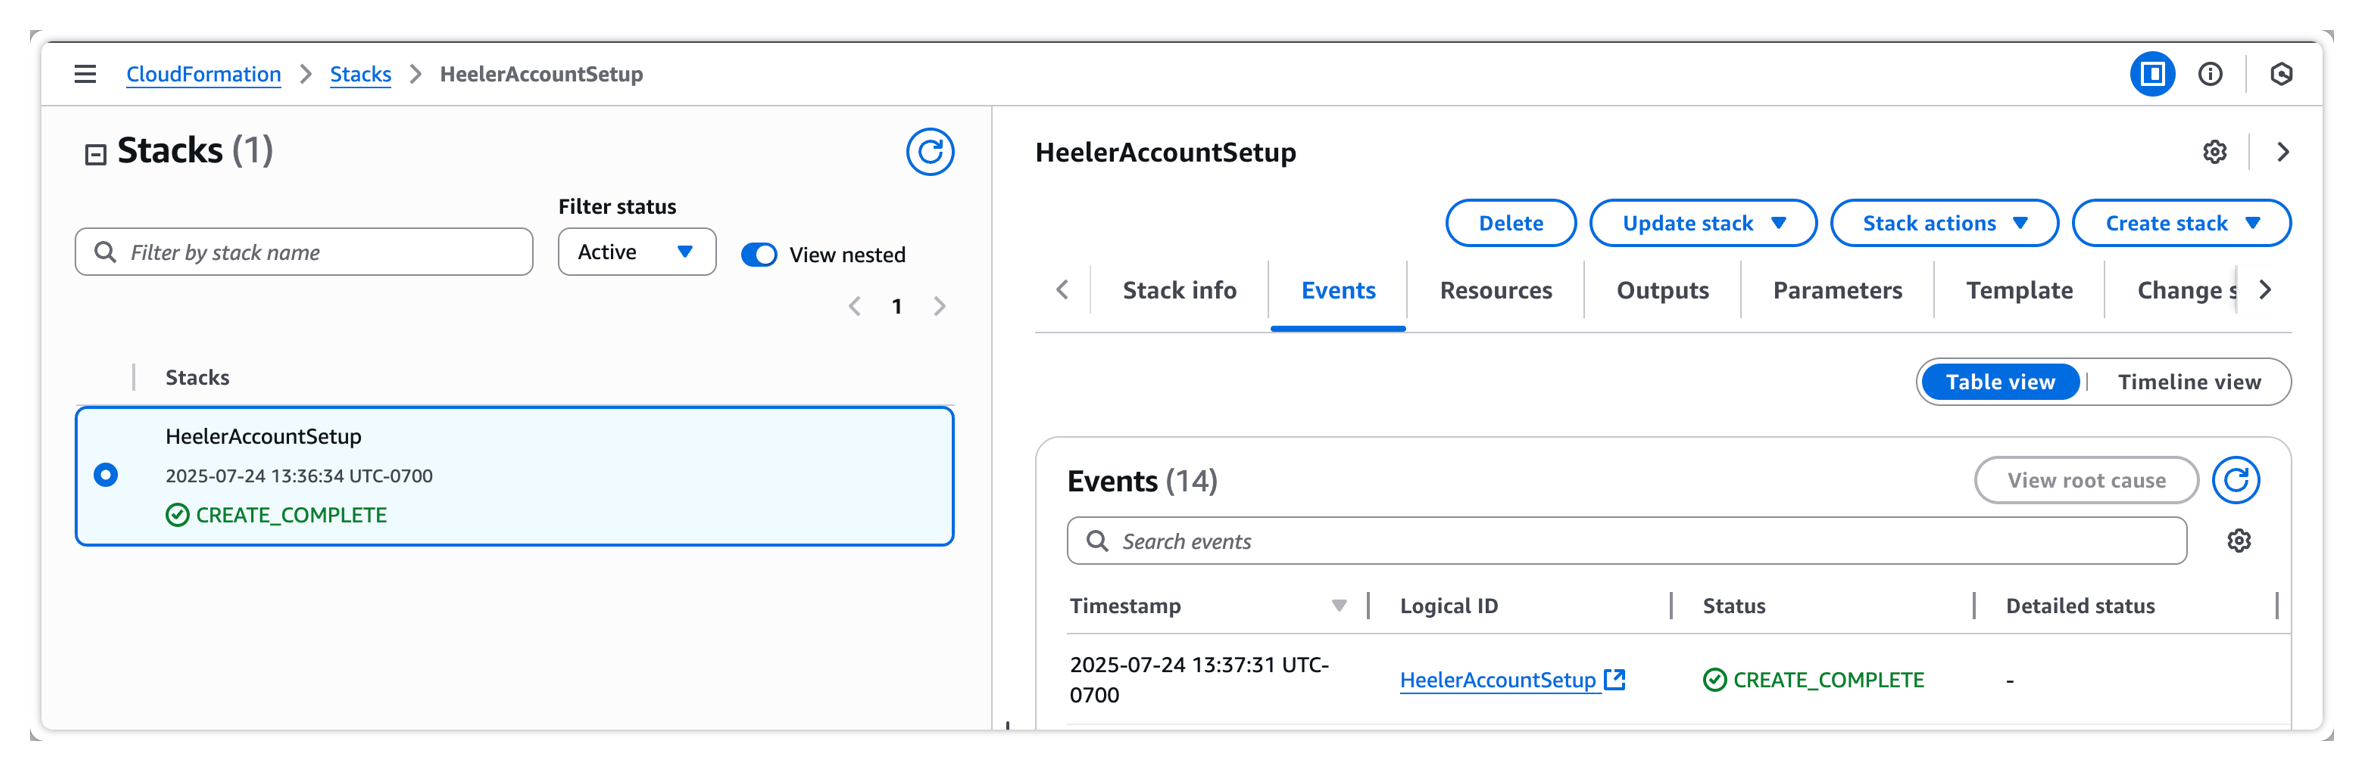
Wait for `CREATE_COMPLETE`, then copy the created **`heeler-member` role ARN**.

<figure><img src="https://414480750-files.gitbook.io/~/files/v0/b/gitbook-x-prod.appspot.com/o/spaces%2FXP3dp2kecwKA2KvYkntz%2Fuploads%2Fgit-blob-814b2461ee9f9e8b342e17450d9e53c7f4068726%2Fcc-cloud-awssingle-10.png?alt=media" alt="The CloudFormation HeelerAccountSetup stack at CREATE_COMPLETE, with the Outputs tab holding the heeler-member role ARN."><figcaption><p>Wait for <code>CREATE_COMPLETE</code>; the <strong>Outputs</strong> tab holds the <code>heeler-member</code> role ARN.</p></figcaption></figure>
{% endstep %}

{% step %}

### Finish in Heeler

Populate and click **Done**:

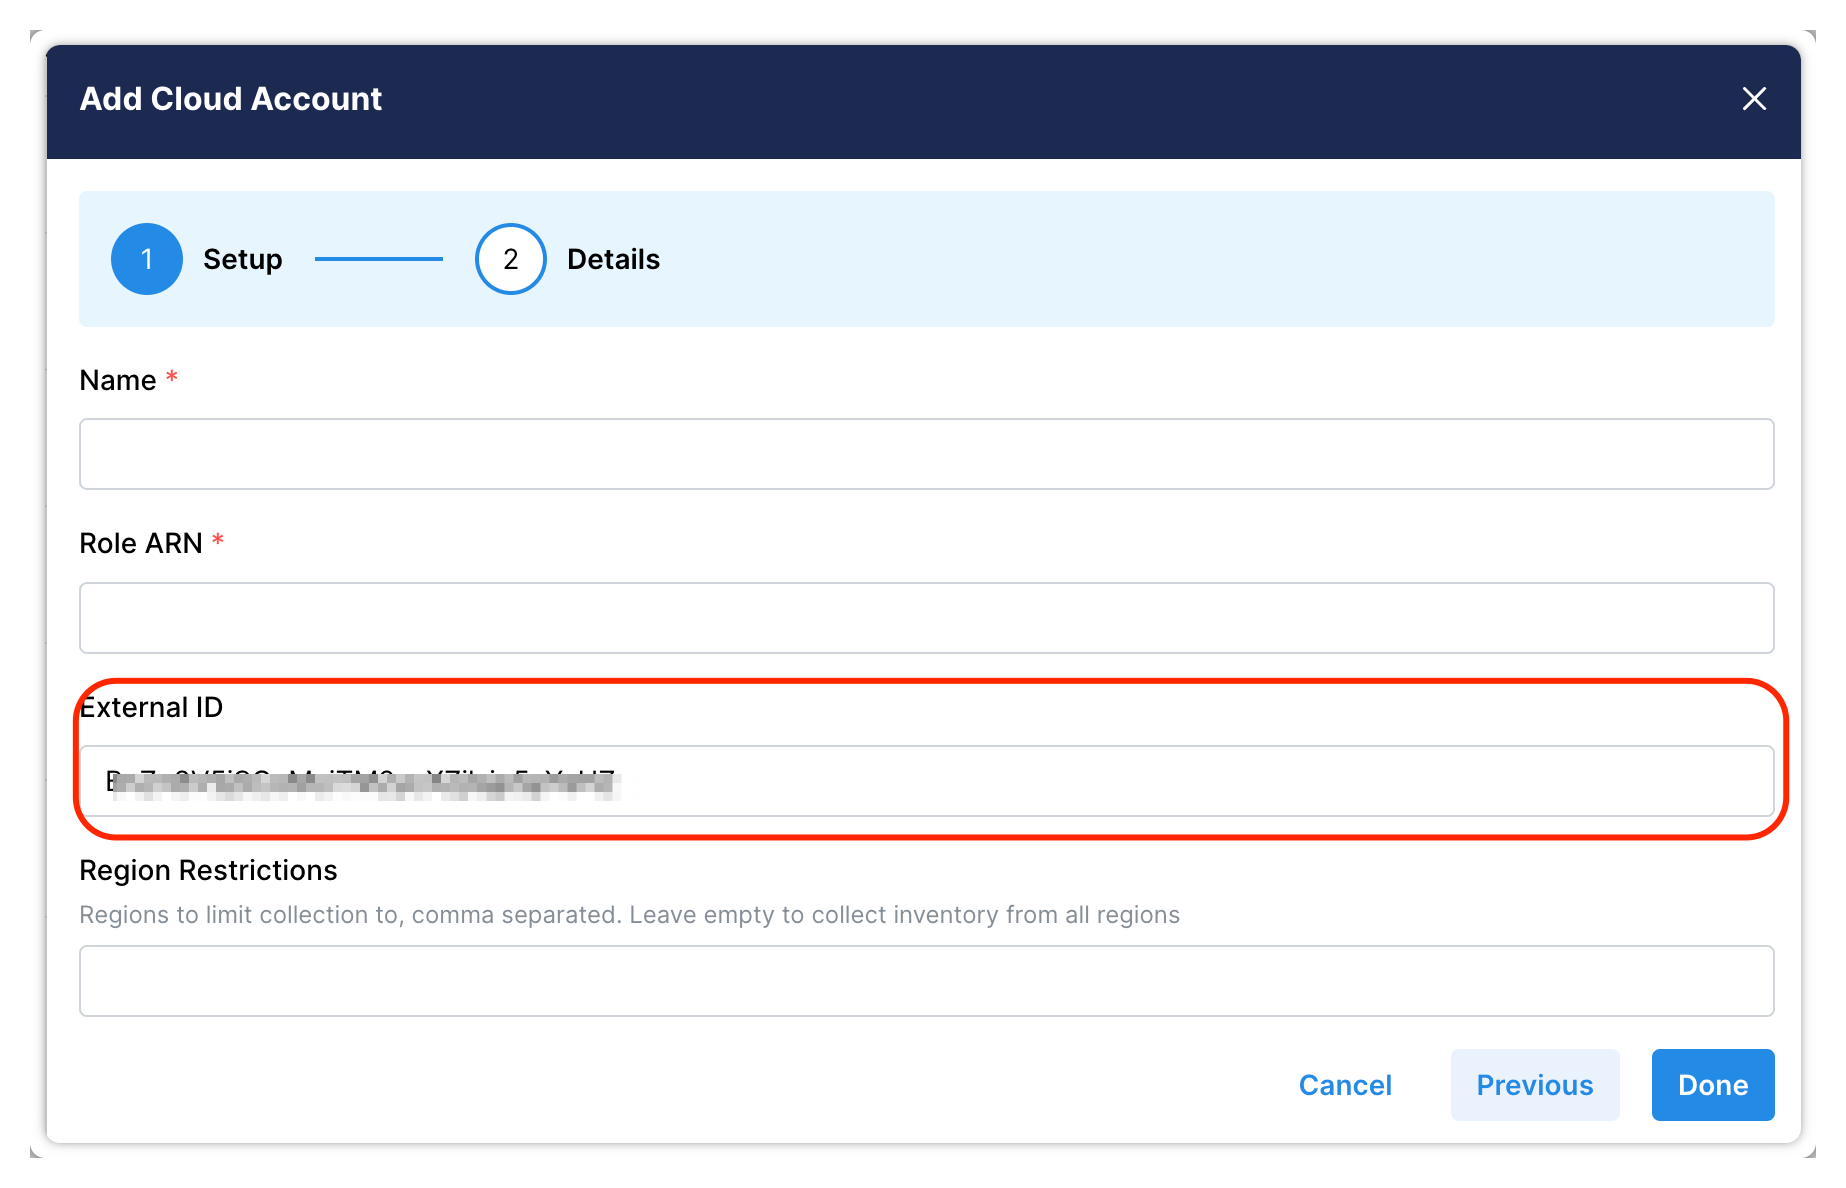
<table><thead><tr><th width="220">Heeler field</th><th>Value</th></tr></thead><tbody><tr><td><strong>Name</strong></td><td>A friendly name for the account.</td></tr><tr><td><strong>Role ARN</strong></td><td>The <code>heeler-member</code> role ARN.</td></tr><tr><td><strong>External ID</strong></td><td>The generated External ID.</td></tr><tr><td><strong>Region Restrictions</strong> (optional)</td><td>Limit harvesting to specific regions.</td></tr></tbody></table>

<figure><img src="https://414480750-files.gitbook.io/~/files/v0/b/gitbook-x-prod.appspot.com/o/spaces%2FXP3dp2kecwKA2KvYkntz%2Fuploads%2Fgit-blob-6fd0c672cf382116fd08bff470b8ef1fbcdc5fa9%2Fcc-cloud-awssingle-06.png?alt=media" alt="The Add Cloud Account Details step in Heeler with Name, Role ARN, External ID, and Region Restrictions fields."><figcaption><p>Paste the <code>heeler-member</code> role ARN and the generated External ID, then click <strong>Done</strong>.</p></figcaption></figure>
{% endstep %}
{% endstepper %}

{% hint style="info" %}
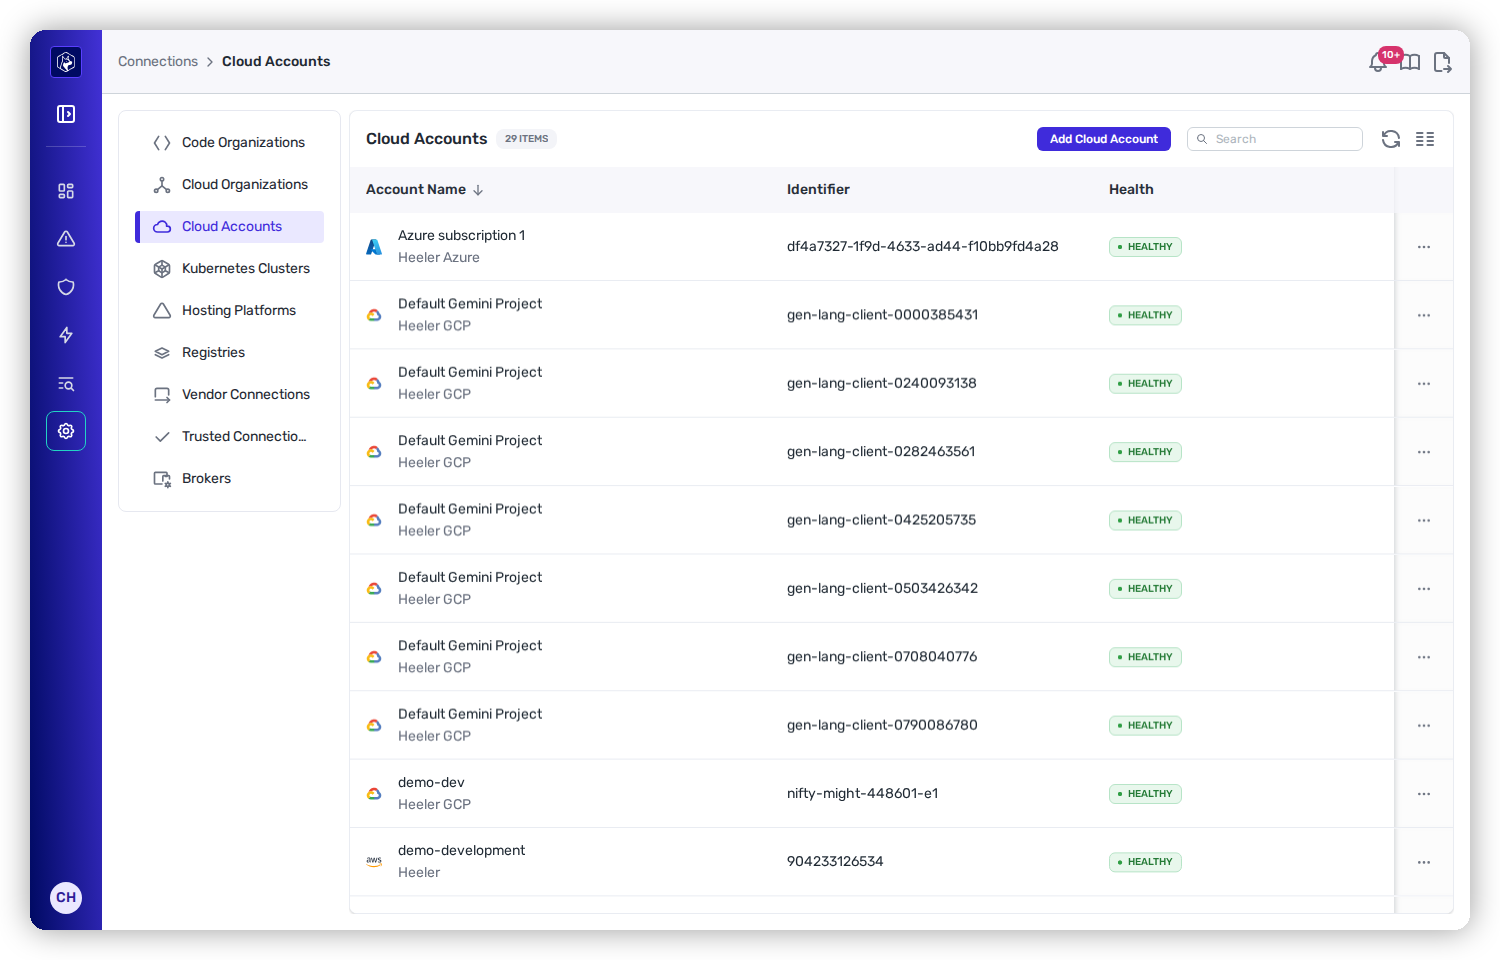
Heeler runs preflight checks before saving; on success the account shows **Healthy** and inventory begins.
{% endhint %}

<figure><img src="https://414480750-files.gitbook.io/~/files/v0/b/gitbook-x-prod.appspot.com/o/spaces%2FXP3dp2kecwKA2KvYkntz%2Fuploads%2Fgit-blob-811d8e62649ed702f0b64e3418581a6ee3ec47dd%2Fcc-cloud-awssingle-14.png?alt=media" alt="The Cloud Accounts list showing the newly added AWS account with a green HEALTHY status."><figcaption><p>A healthy AWS account in the Cloud Accounts list.</p></figcaption></figure>

## About the External ID

The External ID is AWS's confused-deputy safeguard for this trust relationship. The role's trust policy accepts Heeler's principal only when `AssumeRole` includes the exact External ID stored for this connection. That binding helps prevent another Heeler tenant from using Heeler as a confused deputy to access your account.

Use one External ID consistently in the Heeler setup step, your CloudFormation stack or Terraform module, and the final connection form. Record it in your own secret store: after you save the connection, neither the Heeler UI nor API shows it again. When editing, leave the field blank to keep the stored value. To rotate it, update the role's trust policy and the Heeler connection with the same new value in one change window.

## Terraform

The wizard links to the published [`Heeler-Security/heeler-single-account/aws` module](https://registry.terraform.io/modules/Heeler-Security/heeler-single-account/aws/latest).

1. Go to **Connections → Cloud Accounts → Add Cloud Account → AWS → Setup with Terraform**, then click **Next** to reveal the generated **External ID**.
2. Copy the displayed External ID and use that exact value as the module's `external_id` input. It must match the value you later submit to Heeler.
3. The module already defaults `heeler_security_role_arn` to Heeler's production role. Override it only if Heeler support provides a different role ARN.
4. Run `terraform init`, review `terraform plan`, and run `terraform apply`.
5. Retrieve the role ARN:

   ```bash
   terraform output -raw heeler_role_arn
   ```
6. Enter that value in Heeler's **Role ARN** field, keep the same External ID, and finish the connection.

The module supports Terraform `>= 1.11.0, < 2.0.0` and HashiCorp AWS provider `>= 5.0.0, < 7.0.0`. CI tests Terraform 1.11.0 with AWS provider 5.0.0 and Terraform 1.16.1 with AWS provider 6.63.0. When upgrading, run `terraform init -upgrade`, apply, then confirm a second `terraform plan` reports no changes.

## AWS CLI

Choose **Setup account manually → Next** to retrieve the External ID, then download and run the bash script below (it creates the `Heeler` and `HeelerEKS` policies, the `heeler-member` role with the External-ID condition, and attaches `ReadOnlyAccess`):

{% file src="/files/xG75Cf7PzRg8Bp4IR5HS" %}

<figure><img src="https://414480750-files.gitbook.io/~/files/v0/b/gitbook-x-prod.appspot.com/o/spaces%2FXP3dp2kecwKA2KvYkntz%2Fuploads%2Fgit-blob-69007d4e46f5f4f4f4c7378b740bbc1f3e53f49f%2Fcc-cloud-awssingle-13.png?alt=media" alt="The Add Cloud Account wizard in Heeler with Setup account manually selected."><figcaption><p>Choose <strong>Setup account manually → Next</strong> to reveal the External ID the script needs.</p></figcaption></figure>

```bash
aws configure
./heeler_aws_cli.sh
```

The script always creates the `HeelerEKS` policy and has no option to decline it. To onboard the account without that policy, use the CloudFormation template and set **Use a Kubernetes ClusterRole you manage** to `true`. See [A ClusterRole you manage](/mrecEO40m5D6bt7Pq5pE/get-started/cloud-and-runtime/amazon-web-services.md#a-clusterrole-you-manage).

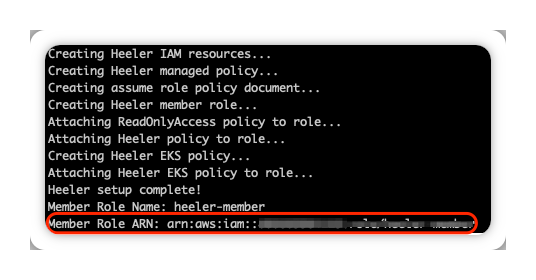
Copy the **Member Role ARN** from the script output and enter it (with the External ID) in the Heeler modal.

<figure><img src="https://414480750-files.gitbook.io/~/files/v0/b/gitbook-x-prod.appspot.com/o/spaces%2FXP3dp2kecwKA2KvYkntz%2Fuploads%2Fgit-blob-7e5760dc102491794d3c6d09b1230b37a030bda0%2Fcc-cloud-awssingle-16.png?alt=media" alt="Terminal output from the AWS CLI script ending with Member Role Name heeler-member and the Member Role ARN."><figcaption><p>The script prints the <strong>Member Role ARN</strong> when it finishes — copy it into Heeler.</p></figcaption></figure>

## Related

* [AWS Organization Setup](/mrecEO40m5D6bt7Pq5pE/get-started/cloud-and-runtime/amazon-web-services/aws-organization-setup.md) — connect the whole org instead (recommended).
* [Amazon Web Services](/mrecEO40m5D6bt7Pq5pE/get-started/cloud-and-runtime/amazon-web-services.md) — setup options and what the template deploys.


---

# Agent Instructions
This documentation is published with GitBook. GitBook is the documentation platform designed so that both humans and AI agents can read, navigate, and reason over technical content effectively. Learn more at gitbook.com.

## Querying This Documentation
If you need additional information that is not directly available in this page, you can query the documentation dynamically by asking a question.

Perform an HTTP GET request on the current page URL with the `ask` query parameter, and the optional `goal` query parameter:

```
GET https://docs.heeler.com/mrecEO40m5D6bt7Pq5pE/get-started/cloud-and-runtime/amazon-web-services/aws-single-account-setup.md?ask=<question>&goal=<endgoal>
```

`ask` is the immediate question: it should be specific, self-contained, and written in natural language.
`goal` is optional and describes the broader end goal you are ultimately trying to accomplish on behalf of the user. GitBook uses it to tailor the answer towards what is most useful for that goal.

The response will contain a direct answer to the question and relevant excerpts and sources from the documentation.

Use this mechanism when the answer is not explicitly present in the current page, you need clarification or additional context, or you want to retrieve related documentation sections.