> For the complete documentation index, see [llms.txt](https://docs.heeler.com/mrecEO40m5D6bt7Pq5pE/llms.txt). Markdown versions of documentation pages are available by appending `.md` to page URLs; this page is available as [Markdown](https://docs.heeler.com/mrecEO40m5D6bt7Pq5pE/get-started/registries-and-artifacts/nexus.md).

# Nexus

Connect Sonatype Nexus so Heeler can analyze the images and artifacts you run — directly, or through the On-Premises Broker.

Heeler connects to the **Sonatype Nexus Repository** (Nexus 3) to analyze the **container images** and first-party **artifacts** in your environment. For an on-prem Nexus instance, Heeler reaches it through the [On-Premises Broker](/mrecEO40m5D6bt7Pq5pE/get-started/registries-and-artifacts/on-premises-broker.md).

{% hint style="info" %}
On the **Add Registry** menu, this provider is listed as **Nexus**.
{% endhint %}

## Before you start

* **Administrator** role in Heeler.
* Permission in Nexus to create a **user token**, or a dedicated automation account with **read** access to the repositories Heeler will analyze.
* For an on-prem instance, the [On-Premises Broker](/mrecEO40m5D6bt7Pq5pE/get-started/registries-and-artifacts/on-premises-broker.md) set up with network access to Nexus **before** you add the registry.

## Step 1 — Create a Nexus user token

A **user token** is safer than a password and avoids exposing personal credentials. See Sonatype's [generating a user token](https://help.sonatype.com/en/user-tokens.html#generating-a-user-token) documentation for details.

1. Log in to your Nexus Repository Manager UI.
2. Click your **username** (top-right) → **User Token**.
3. Click **Access User Token** (or **Reset** to regenerate).
4. Copy the **Username** and **Password** values — these are your username and token for Heeler.

{% hint style="info" %}
If your Nexus administrator has disabled user tokens, request a dedicated automation account with read permissions. For an on-prem instance, [set up the Broker](/mrecEO40m5D6bt7Pq5pE/get-started/registries-and-artifacts/on-premises-broker.md) with access to Nexus first.
{% endhint %}

## Step 2 — Add Nexus in Heeler

{% stepper %}
{% step %}

### Open the modal

Go to **Connections → Registries → Add Registry → Nexus**.
{% endstep %}

{% step %}

### Configure it

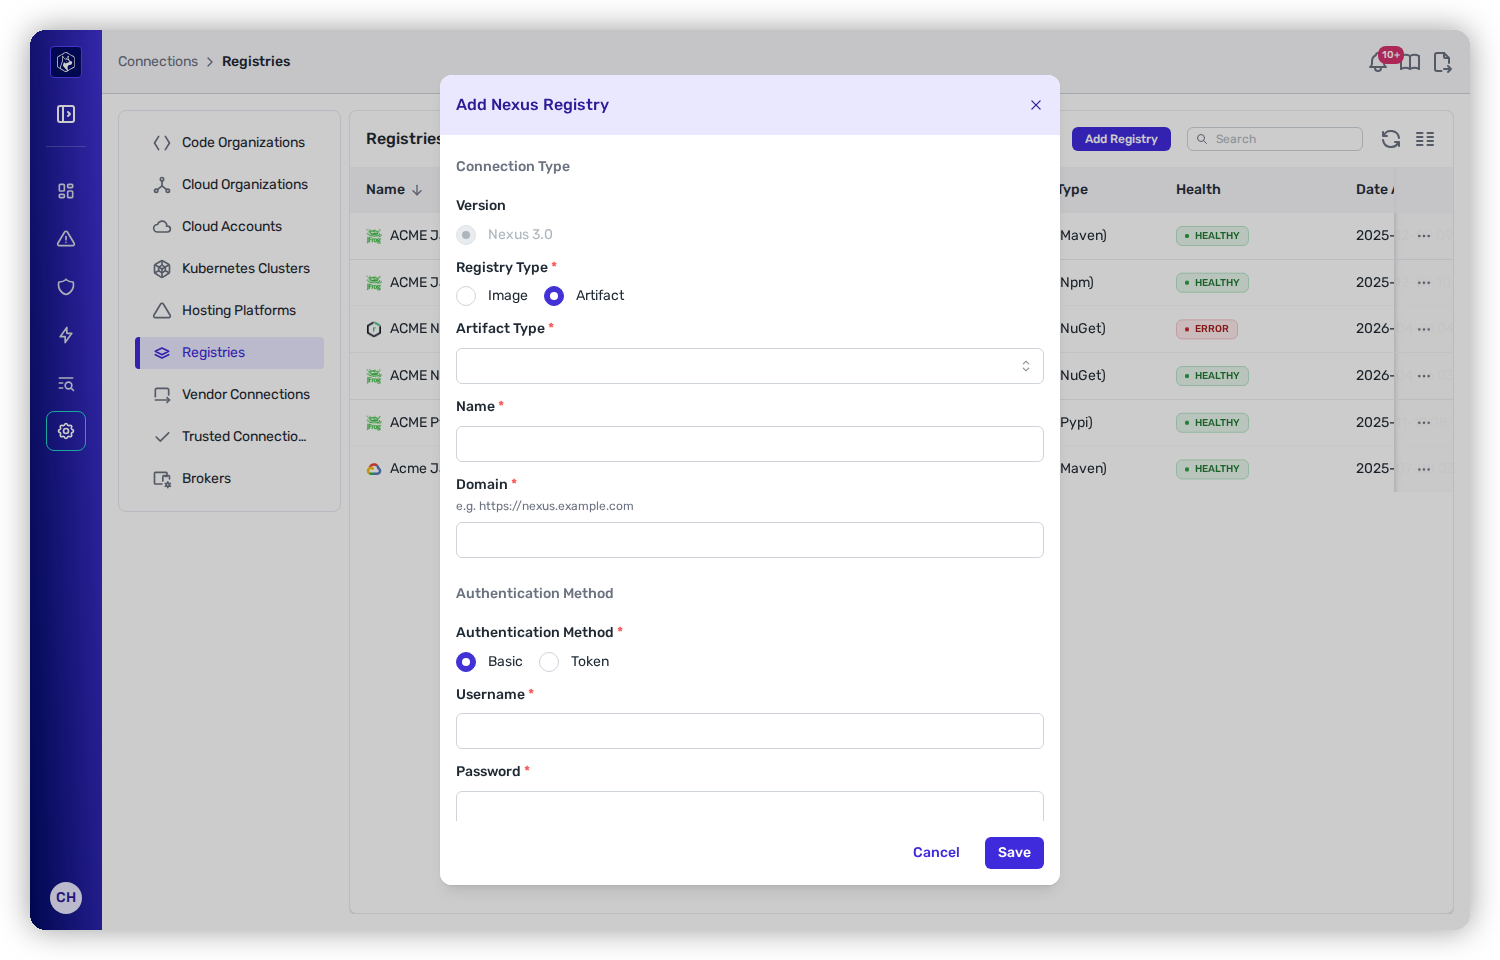
* **Version** — **Nexus 3.0** (the supported version).
* **Registry Type** — **Image** or **Artifact** (Nexus 3 supports both; the modal defaults to **Image**).
* **Artifact Type** *(Artifact only)* — Maven, NPM, NuGet, or PyPI.
* **Name** — a label for the connection.
* **Domain** — the Nexus URL, including scheme (e.g. `https://nexus.example.com`).
* **Authentication Method** — **Basic** (Username + Password) or **Token** (Reference Token).
* **Paths** *(Artifact only)* — one or more repository paths that Heeler should collect from (e.g. `/repository/maven-releases`). You can add multiple paths. Point these at the **hosted** repositories your teams publish into — see the note below.
* **Public Internet Facing** — check if reachable from Heeler's cloud; leave **unchecked** for an on-prem instance reached via the Broker.

<figure><img src="https://414480750-files.gitbook.io/~/files/v0/b/gitbook-x-prod.appspot.com/o/spaces%2FXP3dp2kecwKA2KvYkntz%2Fuploads%2Fgit-blob-d5bcb009fb216ab61e4889f23da266141705a7f7%2Fcc-gs-reg-nexus-form.png?alt=media" alt="The Add Nexus Registry modal with Registry Type set to Artifact, showing Version, Artifact Type, Name, Domain, and Authentication Method."><figcaption><p>Nexus supports image or artifact analysis, with basic or token auth — shown here in Artifact mode.</p></figcaption></figure>

{% hint style="warning" %}
**Use hosted repository paths.** Nexus repositories come in three types: **hosted** (holds the artifacts your teams publish), **proxy** (a cache in front of a public registry such as Maven Central or npmjs), and **group** (aggregates hosted and proxy behind one path).

Adding a registry tells Heeler the packages at those paths are yours, so a proxy or group path asserts that public open-source packages are your first-party code — which distorts the first-party/third-party split wherever it's used, including the **Classification** filter on [Dependencies](/mrecEO40m5D6bt7Pq5pE/catalog/dependencies.md) and the **Exclude first-party packages** option in SBOM exports.

Enter hosted repository paths only. In Nexus, each repository's type is shown under **Administration → Repository → Repositories**.
{% endhint %}

Click **Save**. For a public-facing instance, **Health** updates to **Healthy** once credentials validate.

<figure><img src="https://414480750-files.gitbook.io/~/files/v0/b/gitbook-x-prod.appspot.com/o/spaces%2FXP3dp2kecwKA2KvYkntz%2Fuploads%2FJY0ffn2dcVthwsNqkKDa%2Fimage.png?alt=media&amp;token=39f95906-59c6-40aa-a249-ccb965517e61" alt="The Registries list showing the Nexus connection with a Healthy status."><figcaption><p>Once credentials validate, the connection reports <strong>Healthy</strong>.</p></figcaption></figure>
{% endstep %}

{% step %}

### Link the Broker (on-prem only)

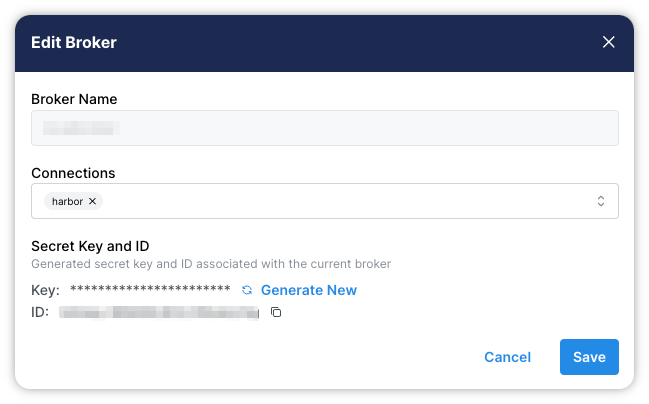
Go to **Connections → Brokers**, **Edit** the broker, select the Nexus connection by name, and **Save**. See [On-Premises Broker](/mrecEO40m5D6bt7Pq5pE/get-started/registries-and-artifacts/on-premises-broker.md).

<figure><img src="https://414480750-files.gitbook.io/~/files/v0/b/gitbook-x-prod.appspot.com/o/spaces%2FXP3dp2kecwKA2KvYkntz%2Fuploads%2FnMkgn1nvueg1dVPYendP%2Fbroker_harbor.png?alt=media&amp;token=dea3e5a5-b70f-42d8-a5e7-0de38783b8c9" alt="The Edit Broker modal with the Nexus connection selected in the broker&#x27;s connection list."><figcaption><p>Select the Nexus connection by name so it runs through the broker.</p></figcaption></figure>
{% endstep %}
{% endstepper %}

## You're done when…

* [ ] The Nexus connection shows **Healthy** under **Connections → Registries** (for an on-prem instance, after the Broker is linked).
* [ ] Images or packages from Nexus correlate in the [Catalog](/mrecEO40m5D6bt7Pq5pE/catalog.md).
* [ ] Findings begin populating — see [Quickstart](/mrecEO40m5D6bt7Pq5pE/get-started/quickstart.md).

## Troubleshooting

<table><thead><tr><th width="300">Symptom</th><th>Fix</th></tr></thead><tbody><tr><td>Connection shows <strong>Unhealthy</strong></td><td>The user token or password is wrong or expired, or the account lacks <strong>read</strong> access to the repositories. Regenerate the token and confirm read permission.</td></tr><tr><td>Nothing appears in the Catalog</td><td>Check the <strong>Domain</strong> (include the scheme, e.g. <code>https://</code>) and, for Artifact mode, the <strong>Paths</strong> — a wrong repository path returns nothing.</td></tr><tr><td>On-prem instance never validates</td><td>The connection isn't linked to the Broker, or the Broker can't reach Nexus. Link it under <strong>Connections → Brokers</strong> and confirm network access.</td></tr></tbody></table>

## Related

* [On-Premises Broker](/mrecEO40m5D6bt7Pq5pE/get-started/registries-and-artifacts/on-premises-broker.md) — required for on-prem Nexus.
* [Connect Registries and Artifacts](/mrecEO40m5D6bt7Pq5pE/get-started/registries-and-artifacts.md) — the common flow.


---

# Agent Instructions
This documentation is published with GitBook. GitBook is the documentation platform designed so that both humans and AI agents can read, navigate, and reason over technical content effectively. Learn more at gitbook.com.

## Querying This Documentation
If you need additional information that is not directly available in this page, you can query the documentation dynamically by asking a question.

Perform an HTTP GET request on the current page URL with the `ask` query parameter, and the optional `goal` query parameter:

```
GET https://docs.heeler.com/mrecEO40m5D6bt7Pq5pE/get-started/registries-and-artifacts/nexus.md?ask=<question>&goal=<endgoal>
```

`ask` is the immediate question: it should be specific, self-contained, and written in natural language.
`goal` is optional and describes the broader end goal you are ultimately trying to accomplish on behalf of the user. GitBook uses it to tailor the answer towards what is most useful for that goal.

The response will contain a direct answer to the question and relevant excerpts and sources from the documentation.

Use this mechanism when the answer is not explicitly present in the current page, you need clarification or additional context, or you want to retrieve related documentation sections.