> For the complete documentation index, see [llms.txt](https://docs.heeler.com/mrecEO40m5D6bt7Pq5pE/llms.txt). Markdown versions of documentation pages are available by appending `.md` to page URLs; this page is available as [Markdown](https://docs.heeler.com/mrecEO40m5D6bt7Pq5pE/get-started/users-and-access/scim-provisioning.md).

# SCIM Provisioning

Automate user lifecycle management with SCIM 2.0 — provision, update, and deactivate accounts from your identity provider.

**What SCIM covers:** account lifecycle without an administrator in the path. Where [SAML](/mrecEO40m5D6bt7Pq5pE/get-started/users-and-access/saml.md) handles *how users log in*, SCIM handles *how accounts are created, updated and removed*. Assign someone to Heeler in your IdP and their account is created; remove them and Heeler **deactivates the account, destroys active sessions, and revokes API tokens** — access is cut immediately, no manual step. Heeler supports SCIM 2.0 with any compliant provider, such as Okta and Microsoft Entra ID.

## Before you start

* [SAML SSO](/mrecEO40m5D6bt7Pq5pE/get-started/users-and-access/saml.md) **configured and working** — SCIM builds on it, and provisioned users authenticate through your IdP.
* An identity provider that supports **SCIM 2.0**.
* **Administrator** access in Heeler to generate SCIM tokens.

{% hint style="info" %}
SCIM requires SAML first. Users created by SCIM are created with SAML enabled and log in through your IdP. Once SCIM is active, SAML **Just-in-Time provisioning is disabled** so the two don't conflict.
{% endhint %}

## When to use SCIM vs. SAML JIT

Both create accounts from your IdP; they differ in what else they automate. For larger organizations SCIM is recommended — it removes the manual lifecycle work entirely.

| Need                                                | Best fit                             |
| --------------------------------------------------- | ------------------------------------ |
| Auto-create users on first IdP login                | SAML Just-in-Time                    |
| Auto-deactivate users when they leave the IdP group | **SCIM**                             |
| Give every provisioned user the same starting role  | **SCIM** (configurable default role) |
| Lightweight setup, small team                       | SAML JIT                             |

Neither SCIM nor SAML JIT assigns roles from IdP group membership; set roles per user in Heeler.

## Set up SCIM in Heeler

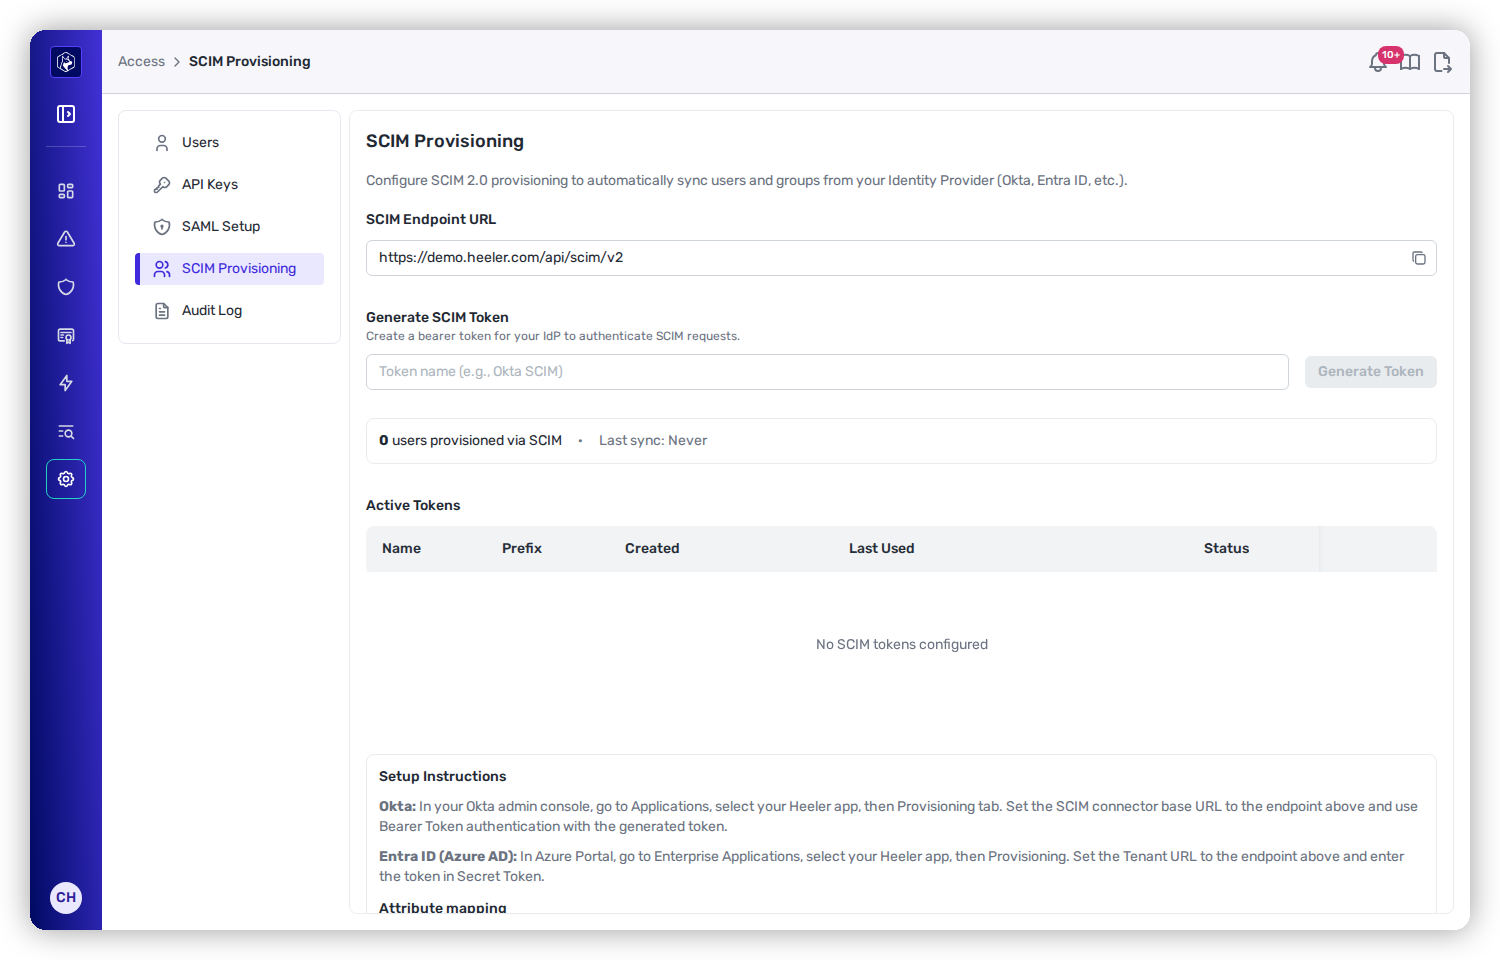
Open **Administration → Access → SCIM Provisioning**.

<figure><img src="https://414480750-files.gitbook.io/~/files/v0/b/gitbook-x-prod.appspot.com/o/spaces%2FXP3dp2kecwKA2KvYkntz%2Fuploads%2Fgit-blob-6299bb135258ad56dd042cc1aa18dd2f1621705f%2Fcc-gs-scim-setup.png?alt=media" alt="The SCIM Provisioning page: the SCIM Endpoint URL, a Generate SCIM Token field, a count of users provisioned via SCIM, the Default role for new users picker, the Active Tokens table, and per-IdP setup instructions."><figcaption><p>SCIM Provisioning — copy the endpoint URL, generate a token, choose the default role for new users, and manage active tokens.</p></figcaption></figure>

{% stepper %}
{% step %}

### Copy the SCIM endpoint URL

It's shown at the top of the page, in the form `https://<your-heeler-domain>/api/scim/v2`. You'll paste this into your IdP.
{% endstep %}

{% step %}

### Generate a bearer token

Enter a descriptive name (e.g. *"Okta SCIM"*), click **Generate Token**, and **copy the token immediately** — it's shown only once and can't be retrieved later.
{% endstep %}

{% step %}

### Choose the default role (optional)

Under **Default role for new users**, pick the role SCIM-created accounts start with. It's **Team viewer** unless you change it; Administrator roles aren't offered. The choice applies to accounts created from then on.
{% endstep %}

{% step %}

### Configure your IdP

Use the endpoint URL and bearer token to set up provisioning in your identity provider — see the provider steps below.
{% endstep %}
{% endstepper %}

{% hint style="warning" %}
Store the bearer token securely. If you lose it, generate a new one and update your IdP — the original can't be recovered.
{% endhint %}

## Configure your identity provider

{% tabs %}
{% tab title="Okta" %}

1. In the Okta admin console, open **Applications** and select your Heeler application.
2. On the **Provisioning** tab, click **Configure API Integration** and check **Enable API Integration**.
3. Set the **SCIM connector base URL** to Heeler's endpoint URL.
4. Set **Authentication Mode** to **HTTP Header**, and paste the Heeler bearer token into the **Authorization** field (include the full token, `h4r-scim-` prefix and all).
5. Click **Test API Credentials**, then **Save**.
6. Under **Provisioning → To App**, click **Edit** and enable **Create Users**, **Update User Attributes**, and **Deactivate Users**.

Okta maps these attributes automatically:

| Okta attribute | SCIM attribute    | Heeler field   |
| -------------- | ----------------- | -------------- |
| `userName`     | `userName`        | Email address  |
| `givenName`    | `name.givenName`  | First name     |
| `familyName`   | `name.familyName` | Last name      |
| `active`       | `active`          | Account status |
| {% endtab %}   |                   |                |

{% tab title="Microsoft Entra ID" %}

1. In the Azure Portal, open **Microsoft Entra ID → Enterprise Applications** and select your Heeler application.
2. Open **Provisioning**, click **Get started**, and set **Provisioning Mode** to **Automatic**.
3. Under **Admin Credentials**, set **Tenant URL** to Heeler's endpoint URL and **Secret Token** to the Heeler bearer token.
4. Click **Test Connection**, then **Save**.
5. Under **Provisioning → Mappings → Provision Microsoft Entra ID Users**, verify the mappings below, then **Save**.
6. On the Provisioning overview, set **Provisioning Status** to **On** and **Save** to start the first cycle.

| Entra ID attribute                                        | SCIM attribute    | Heeler field   |
| --------------------------------------------------------- | ----------------- | -------------- |
| `userPrincipalName`                                       | `userName`        | Email address  |
| `givenName`                                               | `name.givenName`  | First name     |
| `surname`                                                 | `name.familyName` | Last name      |
| `Switch([IsSoftDeleted],, "False","True","True","False")` | `active`          | Account status |

{% hint style="info" %}
Entra ID's initial provisioning cycle can take several minutes depending on how many users are in scope; incremental cycles then run roughly every 40 minutes.
{% endhint %}
{% endtab %}
{% endtabs %}

## How SCIM and SAML work together

<table><thead><tr><th width="330">When…</th><th>Heeler…</th></tr></thead><tbody><tr><td>A user is assigned in your IdP</td><td>SCIM creates the account, with SAML enabled and the tenant's default role for new users</td></tr><tr><td>That user logs in</td><td>SAML authenticates them via your IdP</td></tr><tr><td>Their name changes in your IdP</td><td>SCIM syncs first and last name</td></tr><tr><td>They're removed from your IdP</td><td>SCIM deactivates the account, destroys sessions, and revokes API tokens</td></tr><tr><td>SCIM is active and SAML JIT was on</td><td>SCIM takes precedence — JIT is disabled to prevent conflicts</td></tr><tr><td>A deactivated user attempts to log in</td><td>Login is rejected, even if their IdP session is still valid</td></tr></tbody></table>

## What SCIM supports

| Feature                                           |                                               Supported                                              |
| ------------------------------------------------- | :--------------------------------------------------------------------------------------------------: |
| User provisioning (create)                        |                                                   ✅                                                  |
| User deprovisioning (deactivate)                  |                                                   ✅                                                  |
| User attribute sync (update)                      |                                                   ✅                                                  |
| Default role for new users                        | ✅ — one tenant-wide default, chosen in Heeler (no per-user role attribute, no group-to-role mapping) |
| Filter users (`userName`, `externalId`, `active`) |                                                   ✅                                                  |
| Group provisioning                                |                                ❌ — Heeler Teams are managed separately                               |
| Bulk operations                                   |                                                   ❌                                                  |
| Password sync                                     |                               ❌ — SAML users authenticate via your IdP                               |

## Managing tokens

The SCIM Provisioning page lists every token for your tenant — name, prefix, creation date, and status (Active or Revoked).

* **Revoke** — click the delete icon next to a token and confirm. This immediately stops your IdP's SCIM requests; provisioning halts until a new token is configured.
* **Rotate** — generate a new token, update it in your IdP, verify with the IdP's test feature, then revoke the old token.

## Common problems

<table><thead><tr><th width="330">Symptom</th><th>Fix</th></tr></thead><tbody><tr><td>The IdP's test connection returns <strong>401 Unauthorized</strong></td><td>The token was pasted without its <code>h4r-scim-</code> prefix, or the authentication mode is wrong. Paste the <strong>full</strong> token (prefix and all), and set Okta's <strong>Authentication Mode</strong> to <strong>HTTP Header</strong> / Entra ID's <strong>Secret Token</strong> field — not a query parameter.</td></tr><tr><td>Users aren't provisioning into Heeler</td><td>Confirm <strong>Create Users</strong> is enabled in your IdP's provisioning settings, and that the user is actually <strong>assigned</strong> to the Heeler application in the IdP. Unassigned users are never sent.</td></tr><tr><td>Assigned users still don't appear (Entra ID)</td><td>Entra ID's first provisioning cycle can take several minutes, and incremental cycles run roughly every 40 minutes — see the note under <a href="#configure-your-identity-provider">Configure your identity provider</a>. Wait for the cycle, or use <strong>Provision on demand</strong> to push a single test user immediately.</td></tr></tbody></table>

## You're done when…

* [ ] A SCIM token is generated and stored in your IdP.
* [ ] The default role for new users is set (Team viewer unless you changed it).
* [ ] Your IdP's test connection succeeds.
* [ ] Create / Update / Deactivate are enabled in your IdP.
* [ ] Assigning a test user in the IdP creates their account in Heeler.

## Related

* [Roles and Permissions](/mrecEO40m5D6bt7Pq5pE/get-started/users-and-access/roles-and-permissions.md) — set what provisioned users can see and do.


---

# Agent Instructions
This documentation is published with GitBook. GitBook is the documentation platform designed so that both humans and AI agents can read, navigate, and reason over technical content effectively. Learn more at gitbook.com.

## Querying This Documentation
If you need additional information that is not directly available in this page, you can query the documentation dynamically by asking a question.

Perform an HTTP GET request on the current page URL with the `ask` query parameter, and the optional `goal` query parameter:

```
GET https://docs.heeler.com/mrecEO40m5D6bt7Pq5pE/get-started/users-and-access/scim-provisioning.md?ask=<question>&goal=<endgoal>
```

`ask` is the immediate question: it should be specific, self-contained, and written in natural language.
`goal` is optional and describes the broader end goal you are ultimately trying to accomplish on behalf of the user. GitBook uses it to tailor the answer towards what is most useful for that goal.

The response will contain a direct answer to the question and relevant excerpts and sources from the documentation.

Use this mechanism when the answer is not explicitly present in the current page, you need clarification or additional context, or you want to retrieve related documentation sections.
